How to move iMovie project from one Mac to another
Many a time you want to move your iMovie project from one Mac to another because you got an upgraded laptop or you want to send it to your friend so that they can continue work on it or you want to have it back up at someplace or simply you want to move… 🙂
In this how-to, we will see how to move an iMovie project from one Mac to another.
As per the comment on the YouTube video, even Apple support won’t provide you an easy way to do so.
But we have an easy working trick that will bring a smile to your face.
Let’s get started. Jump to video tutorial
Source Mac
- Click on the Finder icon then from the top menu click on Go then Home then Movies
- Inside the Movies folder, you will find – iMovie Library and iMovie Theater.
- Right-click on iMovie Library and then click on Show Package Contents
- It will open the iMovie project folder where you can see all your projects.
- Copy the project (folder) which you want to move to another Mac to your removable drive like a Memory card/Pen Drive.
- This much only you have to do in source Mac. Now let’s go-to the destination Mac.
Destination Mac
- Here also we have to follow almost the steps above with some additional steps.
- Click on the Finder icon then from the top menu click on Go then Home then Movies
- Inside the Movies folder, you will find – iMovie Library and iMovie Theater.
- Right-click on iMovie Library and then click on Show Package Contents
- Paste the project (folder) that you copied from the source Mac
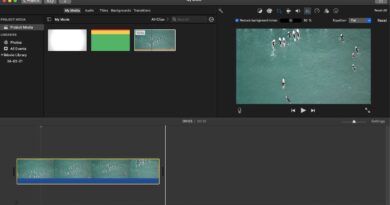
- Open the iMovie application and click on Projects in the left top corner.
- You won’t find here the project that you copied. This is because you copied it directly and iMovie doesn’t know about it.
- Let’s do a trick to let iMovie know about this copied project.
- Create a new project by clicking on Create New then Movie. This will create a new project and show you panels and timeline to add videos and all.
- Click again the project button in the top left corner. It will ask you to provide a name to save the project. Enter some name like temp delete project and click Ok
- Now go to the project folder using Finder where you copied the project (folder). You will find a new project (folder) – temp delete project
- Delete this project by right-clicking on it and then Move to bin. This will delete the project (folder).
- Close the iMovie application and open it again.
- It will show you, The library “iMovie Library” is damaged. This is because we deleted the project temp delete project directly and iMovie thinks the library is damaged. It will also give you an option to Repair.
- Click on the Repair button and it will repair the library. While repairing, it will find temp delete project is deleted so it will remove from the list. Also, it will find there is a new project that you copied from the source Mac so it will add it to the list.
- Now click on the project that you copied from the list and it will open it for editing. Voila, You got your project moved!!
- One thing you will notice that the source media is not showing so right-click on timeline video and then click Reveal in project media and it will start showing the media in the My media panel
Hard to understand? Watch the YouTube video here
Please make sure the iMovie version in the source and destination Mac are the same. Sometimes this won’t work if the versions are not the same.
See more: